How to set the clock on an AEG oven
Issue
A flashing clock or incorrect time display does not usually indicate a fault with the oven. It typically means that the clock needs to be set before certain oven functions can operate normally.
The most common causes are:
- Recent installation of the oven
- A power cut or temporary loss of power
- Electrical work carried out in the home
- The oven being disconnected from the power supply
- A manual reset of the oven settings
- Seasonal clock changes, such as daylight saving time
Many ovens use the clock setting to manage timer functions, delayed cooking programmes, cooking duration settings, and other time-related features. If the power supply is interrupted, the stored time may be lost. As a result, the clock may flash to indicate that the time needs to be entered again.
Once the correct time is set, the flashing display stops and all timer-related functions become available as intended. In many models, setting the clock is a normal part of installation and is required after a power interruption.
Applies to
- AEG Ovens
- AEG Cookers
Resolution
Setting the Time on Your Oven
Modern ovens may feature different types of control panels -such as touchscreens, rotary knobs, or digital buttons. Because each configuration can have a unique process for setting/changing the time, we recommend referring to the specific steps outlined in your oven’s user manual.
A flashing oven clock (showing 00:00 or 12:00) indicates that the clock was not set after the appliance's installation or that there was a power cut.
Set the time by following the instructions in the user manual (chapter Clock Functions).
How to find and download the correct oven user manual
To ensure you download the correct user manual for your oven, you will need the appliance's PNC (Product Number Code) from the data plate.
Step 1: Locate the oven data plate
The data plate contains important identification information, including the model number and PNC.
For most ovens, the data plate can be found:
- Around the oven door frame
- On the front frame of the oven cavity, visible when the door is opened
Open the oven door and look for a rating plate sticker or metal plate displaying:
- Model
- PNC (usually a 9-digit number)
- Serial number
Example:
Model: BPE842720M
PNC: 944188650
Serial No: 12345678
Step 2: Open the User Manual Download page
Go to the User Manual Download page on AEG support website.
Step 3: Enter the PNC number
- Locate the search field on the User Manual page.
- Enter the complete PNC number exactly as shown on the data plate.
- Click Search or press Enter.
Step 4: Select the correct manual
The search results will display documentation associated with the entered PNC.
Download the required:
- User Manual
- Installation Instructions
- Product Information Sheet (if available)
Why use the PNC instead of the model name?
Many oven models have multiple variants with different features, electronics, or configurations. Using the PNC ensures you receive documentation that matches your specific oven.
Important
If the PNC cannot be found on the data plate, you can usually search using the model number. However, searching by PNC provides the most accurate result and helps avoid downloading an incorrect manual.
How to set the clock on your oven or cooker
The steps for setting the time vary depending on the type of control panel fitted to your oven or cooker. If the clock is flashing, displaying an incorrect time, or the oven functions are unavailable after installation or a power interruption, set the correct time using the instructions for your control panel below.
Identify the control panel that most closely matches your oven or cooker and follow the corresponding steps to set the clock. Once the time has been set, the flashing display will normally stop and any timer-related functions will operate as intended.
Examples of oven/cooker control panels and how to set the time:
Command wheel oven

1. Turn the oven ON
2. Use the wheel to select the menu in the top right corner and press the wheel to confirm the choice
3. Turn the wheel to Basic Settings and press the wheel to confirm the choice
4. Turn the wheel to the time of day and press the wheel to confirm the choice
5. Turn the wheel to select the time you want and press to confirm your choice
6. Turn the oven off and the time you have set will show
Time skip into the video at 0:13
Touch Control oven

1. Turn the oven on
2. Use V ("down arrow")  to scroll down the menu to basic settings and press OK
3. Use V to scroll down to the time of day and press OK
4. Use "up" and "down" arrows  to adjust the hour and press OK
5. Use "up" and "down" arrows to adjust the minute and press OK
6. Your time will be set
Skip into the video at 0:50
Rotary Dials oven
Type 1

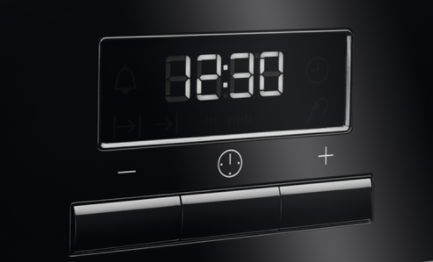
Setting: Time of Day
1. Press the clock function button  until the clock symbol
  appears on the screen.
2. Use "+" (plus) and "-" (minus) buttons to set the time and use the clock function button to switch between hours and minutes .
3. Leave for a few seconds, and the time will set itself.
Skip into the video at 0:32
Type 2

1. Press the clock function button until the time of day symbol appears on the screen.
2. Use the temperature dial to adjust the hour.
3. Press the clock function button to confirm. The display should display the hour set and Min should flash 00.
4. Use the temperature dial to adjust the minutes.
5. Leave for a few seconds, and the time will set itself.
Free Standing Cookers

1. Press the clock function button until the clock symbol appears on the screen.
2. Use "+" (plus) and "-" (minus) buttons to set the time and use the clock function button to switch between hours and minutes.
3. Leave for a few seconds, and the time will set itself.
Cause
FAQ – Setting the oven clock
Why is my oven clock flashing?
A flashing clock usually indicates that the time has not been set after installation or a power cut.
Why does my oven show 00:00?
The stored time setting was lost and needs to be entered again.
Why does my oven show 12:00?
Many oven models display a default time when the clock has not been set.
How do I change the clock after daylight saving time?
Follow the clock-setting instructions in your user manual.
Is a flashing clock a fault?
No. In most cases it is normal behaviour following a power interruption.
Do I need service if I cannot set the clock?
Service may be required if the display or control panel does not respond after following the instructions in the user manual.
Was this article helpful?
Related Articles
- Gas grilling - Open door
- How to Proof Dough in an Oven (Without a Proofing Setting)
- How to clean stainless steel or aluminium oven front panel / door?
- Using the Oven Grill Function
- Oven does not heat up
- How to set an oven timer - AEG
- Symbols and functions on your AEG oven or cooker
- How To Use Dough Proving Oven Function
- Oven display shows PYR
- How to use the Aqua Clean function on your Oven
Spare parts & Accessories
Find original spare parts and accessories for your appliance in our webshop and have them delivered directly to your door.
Related Articles
- Gas grilling - Open door
- How to Proof Dough in an Oven (Without a Proofing Setting)
- How to clean stainless steel or aluminium oven front panel / door?
- Using the Oven Grill Function
- Oven does not heat up
- How to set an oven timer - AEG
- Symbols and functions on your AEG oven or cooker
- How To Use Dough Proving Oven Function
- Oven display shows PYR
- How to use the Aqua Clean function on your Oven